ROLLEASY SUPPORT 651.702.6717
MOUNTING CEILING BRACKET UNIT
STEP ONE (A): TO INSTALL ROLLEASY WITH CEILING BRACKETS TO PLASTER LATH CEILING WHERE: CEILING JOISTS RUN PARALLEL TO ROLLERS.
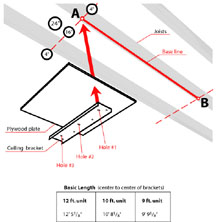
1. Establish straight line of basic length* to coincide with center of joist nearest desired location. Use straight edge of chalk line. This is your base line, AB.
2. At each end of this base line, project a perpendicular line at least 24 inches long using a common carpenter's square. This 24 inch line, should run between the 16 inch centers of the two joists selected for the bearing and 4 inches beyond each of the centers. See sketch. Brackets must be mounted no closer than 2 1/2" from back wall.
3. Cut two 3/4" plywood plates 24x22 inches.
4. Center plywood plates over perpendicular lines at A and B, and mount to ceiling joist using 2 1/2" lag screws.
5. Drill 3/16" hole at point A.
6. Place bracket so that slotted hole #1 and point A coincide. Fasten in place with packaged 1" lag screw.
7. Align bracket so that perpendicular line passes through center of slotted hole #3; drill and fasten.
8. Repeat with second bracket on opposite perpendicular line. Holes1 and 3 are spaced 16 inches on center to coincide with centers of ceiling joists.
Click on the picture to magnify
![]() DOWNLOAD
MOUNTING CEILING UNIT INSTRUCTIONS (zip 399kb)
DOWNLOAD
MOUNTING CEILING UNIT INSTRUCTIONS (zip 399kb)
STEP ONE (B): TO INSTALL ROLLEASY WITH CEILING BRACKETS TO PLASTER LATH CEILING WHERE: CEILING JOISTS RUN PERPENDICULAR TO ROLLERS
STEP TWO: FINAL INSTALLATION INSTRUCTION FOR CEILING UNITS
© 2001 - 15 Photo Tech. All rights reserved.